[ Dlib ] 利用 Dlib訓練 Object Detector
本篇純為筆記,先寫下來擔心自己忘了,同時希望也能幫助到一些朋友。
可能有很多地方有錯,歡迎糾正。
上一篇 "利用 Dlib訓練 Shape Predictor",能夠訓練一個 Predictor去預測物體特徵,而 Object Detector則是從圖像中尋找物體。
其實這篇應該寫在前面才對,順序不小心搞混了。
開始之前需要先確認有安裝 Dlib和 scikit-image,scikit-image可以透過 pip安裝,imglab就有點麻煩了,可以參考官方文檔 imglab的部分。
python_examples中會有一個 train_object_detector.py的文件,一樣可以直接執行。同樣使用 Dlib提供練習用的訓練數據。
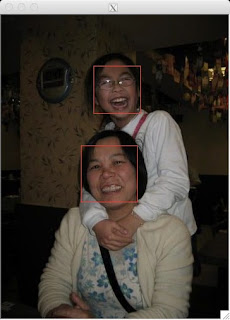
訓練完一樣會秀出幾張訓練的圖片和預測的結果。
 訓練結束後會顯示一些訓練時使用的參數。
接下來一樣需要準備數據。
因為需求想說拿來試試辨識一些手勢,所以找了 Idiap Research Institute提供的 Hand Posture and Gesture Datasets,先拿 A的部分試水溫。
由於提供的圖片是 ppm檔,但 imglab好像不能使用,所以就用 PIL簡單寫了一個小程式把整個資料夾的圖片都轉成我平常使用的 png。
 可以按著 Shift + 滑鼠左鍵選取要捕捉的部分。若選錯可以用滑鼠左鍵雙擊紅色框框,框框變青色就可以按 delete刪除了。
 Object Detector只需要把圖像選取框框就訓練數據就算準備完成了。
我共準備了兩組數據 a_train.xml和 a_test.xml。
訓練前我的資料結構如下。(建立 xml檔時就要注意路徑,建立後就不要隨便搬動)
報錯是因為程序會加載圖像繼續驗證模型,但圖片不會正常加載。除非像 example把所有東西都放在同一個資料夾,但資料會有點難管理。若要改代碼,就要xml裡的圖片路徑,還要輸入驗證的數據等,實在很麻煩。
但其實前面因為有製作 a_testing.xml進行驗證,所以除非有需要,不然其實可以把 line 105以後的代碼註解掉。
這個模型主要是利用 HOG特徵進行訓練,前面文章曾提到用於人臉辨識的 LBPH也是利用 HOG特徵訓練。有興趣可以搜尋一下,資訊還滿多的。
下面的圖就是 HOG所提取的特徵,也是這次訓練所生成的特徵。

訓練完的模型可以透過下面的代碼加載。
可能有很多地方有錯,歡迎糾正。
上一篇 "利用 Dlib訓練 Shape Predictor",能夠訓練一個 Predictor去預測物體特徵,而 Object Detector則是從圖像中尋找物體。
其實這篇應該寫在前面才對,順序不小心搞混了。
開始之前需要先確認有安裝 Dlib和 scikit-image,scikit-image可以透過 pip安裝,imglab就有點麻煩了,可以參考官方文檔 imglab的部分。
python_examples中會有一個 train_object_detector.py的文件,一樣可以直接執行。同樣使用 Dlib提供練習用的訓練數據。
python3 train_object_detector.py ../examples/faces/faces資料夾中,除了照片外,同時也有 training.xml和 testing.xml,這兩個檔案是訓練的重要數據。內容和 training_with_face_landmarks.xml及 testing_with_face_landmarks.xml,有些不同,可以打開來看一下差異。
訓練完一樣會秀出幾張訓練的圖片和預測的結果。
Training complete.
Trained with C: 5
Training with epsilon: 0.01
Trained using 4 threads.
Trained with sliding window 80 pixels wide by 80 pixels tall.
Trained on both left and right flipped versions of images.
Hit enter to continue

Training accuracy: precision: 1, recall: 1, average precision: 1
接下來一樣需要準備數據。
因為需求想說拿來試試辨識一些手勢,所以找了 Idiap Research Institute提供的 Hand Posture and Gesture Datasets,先拿 A的部分試水溫。
由於提供的圖片是 ppm檔,但 imglab好像不能使用,所以就用 PIL簡單寫了一個小程式把整個資料夾的圖片都轉成我平常使用的 png。
import os
import glob
from PIL import Image

folder_path = './Marcel-Train/A'
img_list = glob.glob('{0}/*.ppm'.format(folder_path))

for img in img_list:
    im = Image.open(img)
    im_name = img.split('/')[-1].split('.')[0]+'.png'
    if not os.path.isdir('{0}{1}'.format(folder_path,'_png')):
        os.system('mkdir {0}{1}'.format(folder_path,'_png'))
    im.save('{0}{1}/{2}'.format(folder_path,'_png', im_name))
    print('Convert img {0} in png format'.format(img.split('/')[-1]))

print('Done!!')
接著輸入下列指令,讓 imglab將路徑儲存在 xml文件中。./imglab -c a_train.xml ./A-png接著透過以下指令開啟編輯器。
./imglab a_train.xmlIdiap Research Institute提供的這組 dataset解析度滿低的,可以透過 control + 滾輪縮放。
我共準備了兩組數據 a_train.xml和 a_test.xml。
options = dlib.simple_object_detector_training_options()
...
options.add_left_right_image_flips = False  # 拳頭不是左右對稱的物件,所以選擇 False。
...
options.C = 5  # 這個值越高會使模型更嚴格的去適應圖中的物件,所以過高可能會造成 overfitting,官方建議多嘗試不同數據。
options.epsilon = 0.001  # 這行是我自己加的,預設是 0.001,數字越小計算會越精準,但相對訓練時間也話拉長。
...
options.num_threads = 4  # 訓練所使用的核心數量,需針對自己的電腦的條件來判斷。
options.be_verbose = True  # 有無需要輸出訓練時的資訊。
上面就是剛在 Terminal上顯示的參數。 詳細的參數可以參考 Dlib的文檔。
training_xml_path = os.path.join(faces_folder, "a_train.xml")
testing_xml_path = os.path.join(faces_folder, "a_test.xml")
...
dlib.train_simple_object_detector(training_xml_path, "a_detector.svm", options)
需要的話可以修改訓練數據檔名和模型的檔名。
訓練前我的資料結構如下。(建立 xml檔時就要注意路徑,建立後就不要隨便搬動)
.
├── A_testing_png         # testing data
│   ├── A-complex01.png
│   ├── A-complex02.png
├── A_png                 # training data
│   ├── A-train0001.png
│   ├── A-train0002.png
│   └── ...
├── a_test.xml
├── a_train.xml
└── train_object_detector.py
接著就可以直接輸入下列指令進行訓練
python train_object_detector.py .到最後應該會報錯,但訓練已經完成,沒有意外的話,應該會生成一個 svm的文件,這就是訓練出來的模型了。
報錯是因為程序會加載圖像繼續驗證模型,但圖片不會正常加載。除非像 example把所有東西都放在同一個資料夾,但資料會有點難管理。若要改代碼,就要xml裡的圖片路徑,還要輸入驗證的數據等,實在很麻煩。
但其實前面因為有製作 a_testing.xml進行驗證,所以除非有需要,不然其實可以把 line 105以後的代碼註解掉。
這個模型主要是利用 HOG特徵進行訓練,前面文章曾提到用於人臉辨識的 LBPH也是利用 HOG特徵訓練。有興趣可以搜尋一下,資訊還滿多的。
下面的圖就是 HOG所提取的特徵,也是這次訓練所生成的特徵。
訓練完的模型可以透過下面的代碼加載。
detector = dlib.simple_object_detector("a_detector.svm")
最後簡單使用這個模型建立一個拳頭捕捉器,可惜因為種種的原因,捕捉的精度還不是很高,大致上勉強能辨識。
from imutils import face_utils
import numpy as np
import dlib
import cv2

detector = dlib.simple_object_detector("a_detector.svm")
cam = cv2.VideoCapture(0)

while(True):
    ret, img = cam.read()
    img = cv2.resize(img, (640, 360))
    gray = cv2.cvtColor(img, cv2.COLOR_BGR2GRAY)
    fists = detector(gray, 1)

    for fist in fists:
        (x, y, w, h) = face_utils.rect_to_bb(fist)
        cv2.rectangle(img, (x, y), (x + w, y + h), (255, 0, 0), 3)

    print('SHOWING!!')
    img = cv2.flip(img,1)

    cv2.imshow('Fist', img)
    if cv2.waitKey(1)==ord('q'):
        break

cam.release()
cv2.destroyAllWindows()
留言
張貼留言